How to Make a Bee Feeder: A Simple DIY Guide for Healthy Hives
A handmade feeder costs less than a coffee and can carry a struggling colony through a lean season. Here is exactly how to build one, feed it right and keep your bees safe.
Why feeding your bees matters
Even strong colonies hit hungry stretches: a cold spring, a summer dearth, or a fall that ends before the hive stores enough honey. A feeder is a simple tool that bridges those gaps. If you are still getting started, read how to start beekeeping first, then come back and build something useful with your hands.
Bees feed on nectar, pollen and stored honey. When those run short, syrup gives them quick carbohydrates. Curious about the full menu? Our post on what to feed a bee covers sugar, pollen substitutes and natural forage.
Timing is the real skill. A colony that starts a season with light stores can starve in days during a cold, wet spell, even when the calendar says spring. Lift the back of the hive to judge weight, or peek at the top bars. If frames look empty and few bees fly, a feeder is cheap insurance. New packages and swarms have no comb or stores at all, so they benefit most. Feeding also helps colonies draw wax, since bees need food to build comb. Treat feeding as a short bridge, and stop once natural forage returns.

Bee feeder for beginners
Check price on AmazonTypes of bee feeders you can make
Before you cut anything, know your options. Each style trades cost, capacity and ease of refilling. Compare them with our roundup of the best bee feeders if you want to buy instead.
| Feeder | Capacity | Difficulty | Best for |
|---|---|---|---|
| Inverted jar | 1–2 qt | Easy | Small colonies, spring |
| Entrance feeder | 1 qt | Very easy | New nucs |
| Frame feeder | 1–2 gal | Medium | Larger colonies |
| Bucket top feeder | 1–5 gal | Medium | Fall stores |
| Baggie feeder | 1 gal | Easy | Quick, cheap fix |
Think about who you are feeding and when. Entrance feeders are easy to watch but can attract robbers. Top feeders hold more and stay inside the box. Frame feeders take up room but are shielded. Open feeders serve many colonies at once but carry the highest risk. For a first hive, the inverted jar is the friendliest choice because it costs little, is easy to inspect and teaches you the basics of syrup handling. Once you manage several hives, larger pails or frame feeders save time.

Frame feeder for hives
Check price on AmazonMaterials and tools you need
The jar feeder needs almost nothing. That is why we build it first. Gather these items before you start:
- Wide-mouth quart glass jar with a metal lid
- Drill and a 1/16-inch bit
- Fine sandpaper
- Scrap wood to drill against
- White cane sugar and clean water
- An empty hive body or shim to shelter the jar
Protect yourself around the hive. Learn how suits perform in our bee suit review, and note that bee suits do not always shield you from wasps, which love syrup too.
Choose materials with care. Glass jars are easy to clean and let you see the level. Plastic works too but can scratch, and scratches hold mold. Metal lids may rust over time, so swap them when you see corrosion. Avoid anything that once held chemicals, paint or strong cleaners. Keep a small toolkit just for feeders so wood dust and oil never touch syrup. Before you start, lay everything on a clean table, wash your hands and dry every piece fully so no soap film remains.

Beekeeping suit for hive work
Check price on AmazonStep-by-step: build the jar feeder
This is the heart of the guide. Follow the six steps in order and you will have a working feeder in about fifteen minutes.
Step 1: Gather your jar, lid and tools
Pick a wide-mouth quart jar with a tight metal lid, a drill with a 1/16-inch bit, fine sandpaper and food-safe gloves. A clean jar matters more than a fancy one. Bees will drink whatever you offer, so anything moldy or greasy will hurt the colony.
Step 2: Drill small holes in the lid
Lay the lid flat on scrap wood and drill six to ten small holes near the center. Go slowly and keep the bit straight. Holes that are too big make syrup pour out and invite robbing.
Step 3: Sand the burrs and rinse
Rough burrs can snag bees’ delicate wings. Rub both sides of the lid with sandpaper until it feels smooth, then rinse with hot water. If your smoker routine is still new, our guide on how a bee smoker works pairs well with this prep.
Step 4: Mix a 1:1 sugar syrup
Stir equal parts white cane sugar and warm water until the liquid runs clear. Let it cool to room temperature. Never use brown sugar, honey from unknown sources or raw sugar, because these can upset bee digestion.
Step 5: Fill the jar and turn it upside down
Fill the jar to the top, screw on the lid tight and flip it over a bowl for a minute. A few drops fall, then suction takes over. If it keeps streaming, your holes are too big.
Step 6: Place the feeder on the hive
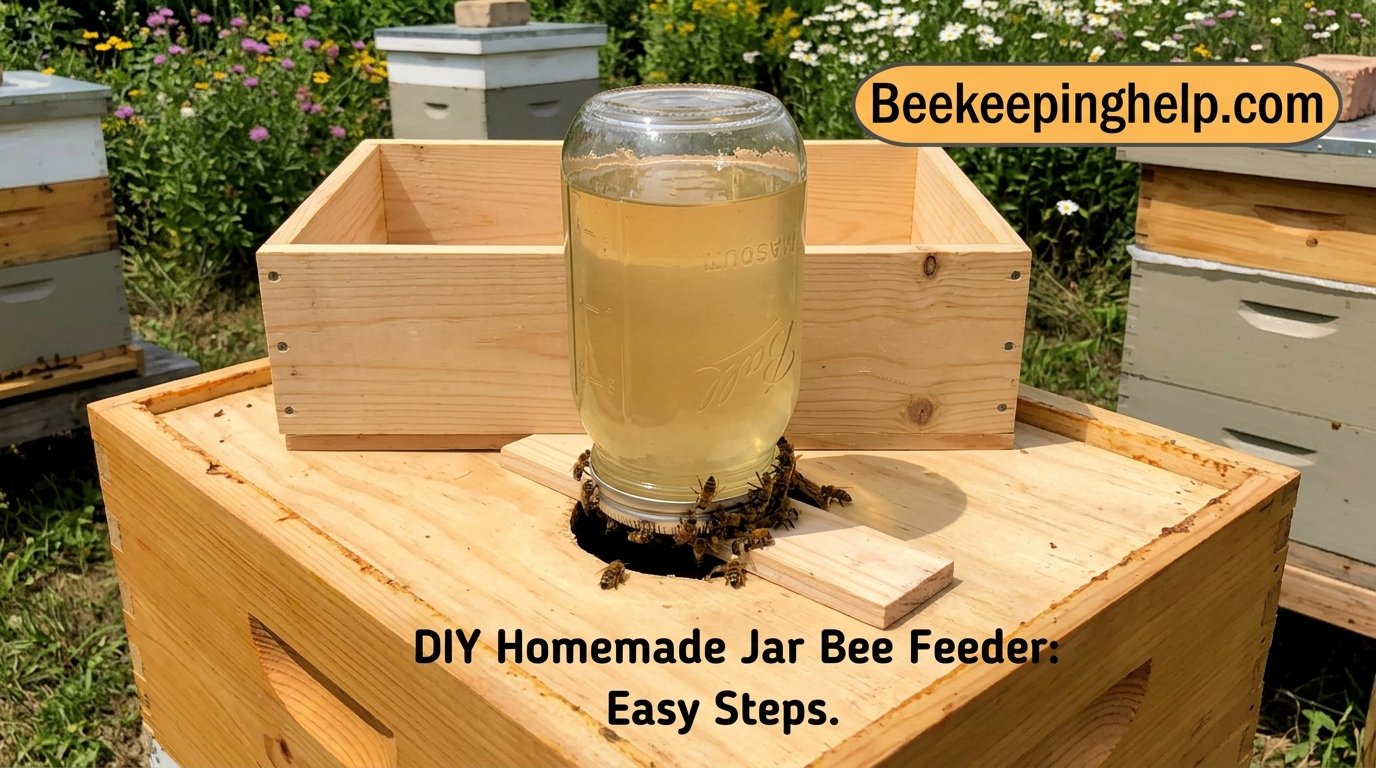
Set the jar over the hole in the inner cover, then cover it with an empty hive body so the syrup stays shaded. Check it every two or three days and refill as needed.
A few habits make this project go smoothly. Work on a flat surface. Drill through the lid from the outside so burrs point inward, then sand them. Test the finished jar over a sink for a full minute before taking it to the hive, since a jar that keeps streaming will flood the bees. If it stops dripping after a few drops, it is ready. Label the lid with the date you drilled it so you can retire it after a season of heavy use.

Bee jar feeder kit
Check price on AmazonSugar syrup recipes that work
Ratios change with the season. Thin syrup mimics nectar and encourages brood rearing, while thick syrup helps bees store food for winter.
| Season | Sugar : water | Purpose |
|---|---|---|
| Spring | 1 : 1 | Stimulates comb building and brood |
| Summer dearth | 1 : 1 | Maintains strength |
| Fall | 2 : 1 | Winter stores |
Always measure by weight or volume, never guess. Add a drop of lemongrass oil only if you are confident about the amount, since too much repels bees.
Never boil syrup hard, because overheating can create compounds that upset bees. Dissolve sugar in hot water off the flame, stir until clear and cool fully before use. Store extra syrup in a clean, covered container in the fridge and discard it after a week or if it turns cloudy. Use plain white sugar only. Skip brown sugar, molasses and powdered sugar with additives. Mold and fermentation smell sour, so trust your nose and pour it out if in doubt.

Bee syrup and feeding supplies
Check price on AmazonWhere to place your feeder
Place jars above the cluster inside the hive, not in the open yard. Feeding outside draws every bee, wasp and ant in the neighborhood. Inside feeding keeps traffic under control. Not sure which box suits your setup? Browse beehive types with pictures and the best beekeeping hives for compatible designs.
If you use a Langstroth, an empty deep or shim sits over the inner cover and shelters the jar. See Flow Hive vs Langstroth for how these designs differ.
Height and shelter matter. Bees cluster near the top of the hive in cool weather, so a jar over the inner cover hole places food right where they gather. Shade keeps syrup from warming and spoiling, and a snug empty box stops rain and wind. Level the hive so the jar seats evenly. If the hive tilts forward, water can pool around the lid. Keep grass trimmed around the stand so ants cannot bridge to the feeder.

Hive shim for feeders
Check price on AmazonBoardman and frame feeder variations
Once you have mastered the jar, try a frame feeder that fits inside the box. It holds more syrup and leaves the top clear. Cut a plastic container to fit, add a floating ramp so bees can climb out, and seal every seam.
Pros
- Holds more syrup
- No robbing risk from outside
- Fewer refills
Cons
- Bees can drown without a ramp
- Opens the hive to refill
- Harder to build
To build a frame-style feeder, measure your deep frame and cut a tray a bit narrower so it slides in easily. Line the walls with rough material, glue in a mesh ramp, and add a float that reaches from the syrup to the rim. Leave a small gap at one end so bees can enter. Sand every edge, seal wood with food-safe sealant and let it cure completely before adding syrup. A leaking feeder can drown a colony’s brood nest.

Bee frame feeder
Check price on AmazonPreventing robbing, ants and mold
Syrup is a magnet. Reduce the entrance in fall, wipe spills, and never leave a leaky feeder. Set ant guards on stands if crawlers are common. If mold appears, discard the syrup, scrub with hot water and refill. Keep a bee smoker ready to calm the colony while you work, and read what to use in a bee smoker for fuel ideas.
Watch behavior. Bees fighting at the entrance, wasps circling the hive and bees flying in zigzags all point to robbing. React fast. Narrow the entrance with a reducer, remove open feeders and cover the hive with a damp sheet if needed. Ants are a quieter problem. Set each hive stand leg in a cup of oil or use a barrier so crawlers cannot climb. Wipe spilled syrup with clean water, because even a drop can lure pests within minutes.

Hive ant guard
Check price on AmazonCleaning and maintaining feeders
Rinse feeders after every use. Soak stubborn residue in warm water, avoid strong soap and let parts air-dry. Wear a clean suit each visit; our guide on how to wash a bee suit keeps gear fresh.
Set a cleaning routine. After each refill cycle, dump leftover syrup, scrub the jar with a bottle brush and a splash of hot water, then air-dry it upside down. Avoid harsh cleaners since residue can taint syrup. Check lids for corrosion and holes for clogs. A dry toothpick clears crystallized sugar from tiny openings. Store feeders in a covered tote so mice and dust stay out. Rotate two feeders per hive so one is always clean and ready.

Cleaning brush for hive tools
Check price on AmazonTroubleshooting common problems
- Syrup pours out: Holes are too large. Replace the lid.
- Bees ignore it: Syrup may be too cold, or nectar is flowing.
- Fermenting syrup: Feeding too much at once. Offer smaller amounts.
- Drowning bees: Add floats or a mesh ramp.
Most issues come down to hole size, temperature or timing.
Keep a simple log. Note the date you fed, the ratio, how much disappeared and the weather. Patterns show up fast. If the syrup vanishes overnight, you may have robbers. If it sits untouched for days, the bees may be finding forage or the temperature is too low. Fermenting smell means the bees are not eating it quickly enough, so feed smaller amounts. If dead bees float in the tray, add more floats and rough surfaces at once.

Bee feeder with floats
Check price on AmazonDIY versus store-bought feeders
Homemade costs pennies. Store-bought saves time and often has better capacity.
| Option | Cost | Time | Durability |
|---|---|---|---|
| DIY jar | Very low | 15 min | Medium |
| Plastic frame | Low | None | High |
| Wood Boardman | Medium | None | High |
Pros
- Cheap and customizable
- Easy to repair
Cons
- You supply the labor
- Less polished
Think about total cost, not just the sticker price. A homemade jar costs almost nothing but takes an evening and needs replacement lids. Bought plastic feeders cost more upfront but last for years and often hold more. If you manage many hives, time saved refilling and cleaning can outweigh the cost. If you have one hive and a garage full of jars, DIY wins. Many beekeepers use both, keeping a few store-bought feeders for large jobs and homemade ones for small ones.

Store-bought hive feeder
Check price on AmazonA simple seasonal feeding calendar
Spring: 1:1 syrup as buds open. Summer: feed only during a dearth. Fall: 2:1 syrup until the colony caps stores. Winter: switch to fondant or dry sugar, never liquid in the cold. Learn how the hive works in how a beehive works and the parts of a bee hive. If you want a full DIY hive, try how to make a beehive.
Adjust the calendar for your climate. Cold regions may see winter start early, so fall feeding can begin sooner. Warm areas may need summer feeding during long dry spells. Watch the plants around you. When wildflowers bloom and bees return loaded with pollen, pause the feeder. Always match your feeding to what the bees show you, not a fixed date. Record what worked, so next year you can plan ahead with real experience.

Winter bee fondant
Check price on AmazonKeyword gap: what other DIY bee feeder guides cover that we missed
After comparing this guide with the top-ranking DIY bee feeder pages, the gaps were clear. Competitors cover the baggie feeder, the 5-gallon bucket feeder, open and community feeders with floats or pebbles, a frame feeder with mesh, and when you should not feed at all. The next four sections close those gaps. If you want the finished product instead of a project, our best bee feeder review compares ready-made choices.
| Gap topic | Where it fits |
|---|---|
| Baggie feeder | Section 14 |
| Bucket feeder | Section 15 |
| Open feeder, pebbles, floats | Section 16 |
| When not to feed | Section 17 |
Why does a keyword gap matter? Readers who search for a specific feeder type want a specific answer. If your article lacks a topic, they bounce to a page that has it. Covering each variation in depth, with steps, materials and troubleshooting, helps search engines see the article as complete. It also helps beekeepers, because feeding advice varies by climate, hive style and colony size. Use the sections that follow as a menu and pick what fits your situation.
Bee feeder options
Check price on AmazonHow to make a baggie feeder
The baggie feeder is the cheapest option and needs no woodworking. It sits directly on the top bars, so bees feed close to the cluster, which helps in cool weather. You only need a gallon zip bag, syrup, a shim and a sharp knife. Wear your suit; see our bee suit review if yours is worn out.
Step 1: Fill a zip bag with syrup
Pour syrup into a heavy-duty gallon bag until it is about three quarters full, then press out the air and seal it.
Step 2: Lay the bag on the frames and cut slits
Set the bag flat across the top bars. Cut three short slits in the top. Syrup will seep out gently without flooding.
Step 3: Add a shim and close the hive
Place an empty shim or super around the bag so there is room, then put the cover back on.
Pros
- Nearly free
- Easy to refill
- Keeps syrup warm and close to bees
Cons
- Bags can leak
- Single-use plastic
- Needs a shim
Some tips for baggie success: use heavy-duty bags with a reliable zip, lay them flat and do not overfill. Cut slits along the top, not the sides. If the bag sags, prop it with a small board. Replace bags when they are empty since reused plastic can hold mold. Do not use thin sandwich bags, which tear easily. In cool weather this feeder can be very effective because the bees stay close to the cluster while they drink.

Hive shim for baggie feeders
Check price on AmazonHow to make a bucket feeder
A 5-gallon pail is the workhorse feeder for larger apiaries. It holds a lot, so you refill less often. It is popular for fall feeding when you need to build winter stores quickly. Use a new or food-grade bucket only, since old paint or chemical containers can poison the colony. Not sure your hive style will hold a bucket? Check beehive types with pictures.
Step 1: Drill holes in the lid
Drill small holes in a ring around the center of a snap-on lid. Keep them tiny so syrup drips, not pours.
Step 2: Fill the pail with syrup
Fill with room-temperature syrup, snap the lid tightly and check the seal.
Step 3: Invert over the hive opening
Turn the bucket upside down over the inner cover hole. Cover it with an empty hive body to shade it and keep robbers out.
Refill only when it is nearly empty. Clean the bucket between uses to prevent mold.
Bucket feeders shine in fall when colonies need heavy stores. Keep the hole size small so the syrup does not glug out when you flip the bucket. Some beekeepers squeeze the sides gently to create a vacuum seal. Set the bucket on a stable inner cover and surround it with an empty box. Check often for leaks. Mark the fill line on the outside so you can see how much the bees take each week.

Bucket bee feeder
Check price on AmazonOpen feeders, pebbles and floats for wild bees
An open feeder is the simplest style: a shallow dish, syrup or plain water, and floats so bees do not drown. It works well as a bee waterer for native bees and honey bees in summer. The downside is that it invites robbing, so beekeepers use it carefully and only in short bursts. Learn more about how bees work as a unit in how a beehive works.
Step 1: Add floats and pebbles
Fill a shallow dish with pebbles, wood chips or corks so bees can stand without falling in. Bees cannot swim.
Step 2: Set it away from the hive
Put the dish at least 20 feet from hives in a quiet, shaded spot. Refill daily and wash often.
Pros
- Feeds many colonies at once
- Doubles as a summer bee waterer
- Very cheap
Cons
- High robbing risk
- Attracts wasps and ants
- Weather affects it
A bee waterer is a quiet gift to pollinators in a dry summer. Use a shallow dish, fill it with clean water and add flat stones that poke above the surface. Refresh it daily to prevent mosquitoes. Add a pinch of salt only if you know the local bees like it. Place it near flowers but away from doorways and play areas so people and bees do not collide. Native bees and butterflies will use it too.

Bee waterer for garden
Check price on AmazonWhen you should not feed bees
Feeding is a tool, not a habit. Bees cannot turn syrup into honey you can harvest, so skip feeding during a strong nectar flow. Add syrup only for new colonies, cold springs, dry summers or thin fall stores. Feed once the supers are off. Always read up on what to feed a bee first. Remember, feeders draw wasps too; see whether bee suits protect from wasps.
| Situation | Feed? | What to use |
|---|---|---|
| New package or nuc | Yes | 1:1 syrup |
| Strong nectar flow | No | Natural nectar |
| Late fall, light hives | Yes | 2:1 syrup |
| Deep winter | Sometimes | Fondant or dry sugar |
Signs you should not feed include a strong nectar flow, full supers, warm weather with active foragers, or hives full of capped stores. Feeding then can crowd the brood nest with syrup, leaving the queen no room to lay. Honey supers should never be on the hive while you feed, because syrup may end up in the honey you harvest. If in doubt, check a frame from the brood box and see how much nectar is stored.
Bee fondant for winter
Check price on AmazonHow to make a Boardman entrance feeder
The Boardman feeder is the classic entrance feeder: a wooden base holds an inverted jar at the hive door. You can see the jar from outside, so checking levels needs no hive opening. It holds little, so it suits new colonies and light spring feeding. Before you build, learn how the parts fit together in parts of a bee hive and their functions.
You need a piece of 2×4 scrap or a hardwood block about 6 inches long, a hole saw, a saw or chisel and a perforated cap that screws onto a mason jar. Use plain wood with no paint or treatment.
Step 1: Cut a notch in the base block
Cut a shallow notch so the block slides into the entrance with a gap for bees. Test the fit with your hive entrance reducer removed.
Step 2: Fit a perforated cap on the jar
Drill or buy a perforated cap, fill the jar with 1:1 syrup, screw on the cap and flip it into the base. Wipe any drips.
Place the feeder on a level entrance and tilt it slightly downward so syrup reaches the cap. Because it sits at the entrance, it can draw wasps and robber bees, so only run it during the day when the colony is strong and guard the entrance in the evening. Refill after most of the jar is empty.
Pros
- Easy to check from outside
- Cheap to build
- Holds little syrup, so low risk of spoiling
Cons
- Invites robbing
- Small capacity
- Cold nights can stall drinking
Sizing the base matters. A gap that is too tight can trap bees, and one that is too loose lets rain in. Sand the wood smooth and check the jar sits level. Move the feeder to a shady spot if the entrance faces afternoon sun. Watch for bees clustering on the outside of the jar. That signals the cap holes are too small or the syrup is too cool.
Boardman entrance feeder
Check price on AmazonHow to make a division board feeder
A division board feeder, also called a frame feeder, slides into the hive in place of one or two frames. It keeps syrup inside the box, which lowers robbing risk. Its biggest danger is drowning, so surfaces must be rough and a float is a must. If you are comparing hive designs first, see the best beekeeping hives for deep box sizes.
Gather a thin wooden or plastic tray sized to a frame, food-safe sealant, fine mesh and a twig or popsicle stick for a float. Warm weather works best because in cold snaps bees may not reach the syrup.
Step 1: Cut a mesh ramp for the tray
Glue rough mesh or textured board along the inside walls so bees can climb out. Seal every seam with food-safe sealant so nothing leaks into the hive.
Step 2: Slide it beside the brood frames
Remove two frames, slide in the feeder, fill it and drop in a float. Refill by sliding the box above aside and pouring from a pitcher.
Cleaning is trickier, since you must remove it from the hive. Rinse with hot water and let it dry before storing.
| Feature | Division board | Boardman | Baggie |
|---|---|---|---|
| Capacity | 1–2 gal | 1 qt | 1 gal |
| Robbing risk | Low | High | Low |
| Cold weather | Poor | Poor | Good |
| Cost | Low | Very low | Free |
Placement inside the hive changes how bees find it. Put the feeder next to the cluster when it is cool, and toward the outer edge in warm weather. Some beekeepers add a thin wooden ladder to help bees climb in and out. Check the float every visit, since twigs sink after a while. If you see dead bees in the tray, replace floats and roughen the walls right away.
Division board feeder
Check price on AmazonHow to make fondant and sugar bricks for winter
Liquid syrup is a poor choice when nights turn cold, because bees cannot take cleansing flights. Solid sugar solves that. Fondant packs more sugar per volume than syrup and stays where the bees can reach it. A 2-to-4-quart layer above the cluster works as an insurance policy against starvation.
Step 1: Mix and boil sugar
Dissolve 5 pounds of sugar in about 2 cups of water and heat to roughly 235 F. Stir gently and skim any foam.
Step 2: Pour into a tray and set above the cluster
Pour into a mold, cool, then place a slab right over the cluster. Add a pollen patty on top only if you have beetles under control.
A sugar brick is the low-effort version: mix sugar with a little water until it packs like damp sand, press it into a tray and dry it overnight. Learn how bees spend winter in how a beehive works. If you also work the hives with smoke in cool weather, what to use in a bee smoker helps you keep them calm.
Fondant is a winter tool. Place it directly over the cluster and cover it with a shim so the bees stay warm. Check every couple of weeks and add more only if the block is nearly gone. Do not open the hive on very cold days, since chilling the brood costs more than it saves. If the fondant hardens, spritz lightly with warm water. Solid feed is safer than syrup when cleansing flights are not possible.
Bee fondant and sugar bricks
Check price on AmazonSyrup math: exact recipes, batch sizes and timing
Guessing hurts. Sugar dissolves and adds volume, so a gallon of 1:1 syrup uses about 5 pounds of sugar in 5 pints of water and ends up close to 7.5 pints. For a 2:1 gallon, dissolve 8 pounds of sugar in 4 pints of water. Use very hot water and cool the syrup before filling. Do not feed liquid when temperatures keep the bees from flying.
| Batch | Sugar | Water | Use |
|---|---|---|---|
| 1 pint of 1:1 | 1 lb | 1 pint | New colony, spring |
| 1 gallon of 1:1 | 5 lb | 5 pints | Bulk spring feed |
| 1 gallon of 2:1 | 8 lb | 4 pints | Fall stores |
Only feed syrup when bees can take cleansing flights. Pollen patties can trigger fast brood growth, so do not offer them too early or the colony may not have enough workers to keep the brood warm. Where small hive beetles are common, a pollen feeder or a beetle-proof tray works better than open patties.
Keep a cheat sheet handy: 1:1 for spring and support, 2:1 for fall storage. Weigh sugar on a scale rather than trusting cups, because packing changes volume. Write the mix date on every jar. If you are unsure which ratio to use, ask what the bees need: brood growth, or stored food. Small batches reduce waste, since bees in cool weather drink slowly.
Kitchen scale for mixing syrup
Check price on AmazonRobbing screens, beetles and other feeder problems
Some feeders provoke robbing more than others. Use an entrance reducer or a robbing screen when you feed, keep spills off the ground and never leave open syrup out overnight. Check for small hive beetles under the feeder, since they love slow-moving liquid. See how to make a beehive if you plan to build robbing-resistant boxes. Store your suit clean between visits; here is how to wash a bee suit.
Pros
- Screens reduce robbing
- Shims keep feeding inside
- Regular checks stop mold
Cons
- Extra parts to buy
- Screens need fitting
- More time at the hive
If robbing starts, stop feeding, close entrances to a small gap, and wait until things calm down. Bees will forget the syrup route after a couple of days.
Prevention beats cure. Reduce entrances before feeding, place feeders inside the hive, feed near dusk so foragers are calm, and keep everything clean. Watch the ground for spilled syrup and clean it fast. If you do see robbing, act at once. Many colonies recover, but repeated robbing weakens defenders. Learn the signs early and you will avoid most problems.
Robbing screen for hives
Check price on AmazonFrequently asked questions
Can I use honey to feed bees?
Only use honey from your own healthy hives, since store honey can carry disease.
How big should the holes be?
About 1/16 inch. Larger holes let syrup pour out.
Does the jar feeder work in winter?
Not in freezing temperatures. Use fondant or dry sugar instead.
How often should I refill?
Check every two or three days and top up as needed.
Is white sugar safe?
Yes, plain white cane sugar is the standard choice.
Can I add vitamins?
Only use products made for bees and follow the label.
Why do bees ignore syrup?
Usually because a nectar flow is on or the syrup is too cold.
How do I stop robbing?
Reduce entrances, wipe spills and feed inside the hive.
Can I use a plastic bottle?
Yes, but glass with a metal lid lasts longer and is easier to clean.
How much syrup does a colony need?
It varies with colony size, weather and forage, so watch consumption and adjust.
Can I make a bee feeder from a plastic bottle?
Yes. Poke tiny holes in the cap and invert it, but use food-grade plastic and check for leaks.
What is a baggie feeder?
A zip bag filled with syrup, laid on the top bars with a few slits cut in it.
Is a 5-gallon bucket feeder safe?
Yes, if the bucket is food-grade and clean. Never reuse a paint or chemical pail.
Why add pebbles or floats?
Bees cannot swim. Floats give them a safe place to stand.
How much sugar makes a gallon of 1:1 syrup?
About 5 pounds of sugar in 5 pints of water.
Can I feed liquid syrup in winter?
Not when bees cannot fly. Use fondant or sugar bricks.
What is a division board feeder?
A frame-sized tray that holds syrup inside the hive.
Do pollen patties attract beetles?
They can, so use a pollen feeder in beetle areas.
Conclusion
A good feeder is small, cheap and easy to clean. Start with the jar, watch how your colony responds and upgrade only when you need more capacity. Happy beekeeping!
Shop bee feeders
Check price on Amazon