Parts of a Bee Hive and Their Functions: The Complete Beekeeper’s Guide
Every board, box, and bar inside a hive has a job. Learn what each part does, why it matters to the colony, and how to choose, maintain, and upgrade your own equipment with confidence.
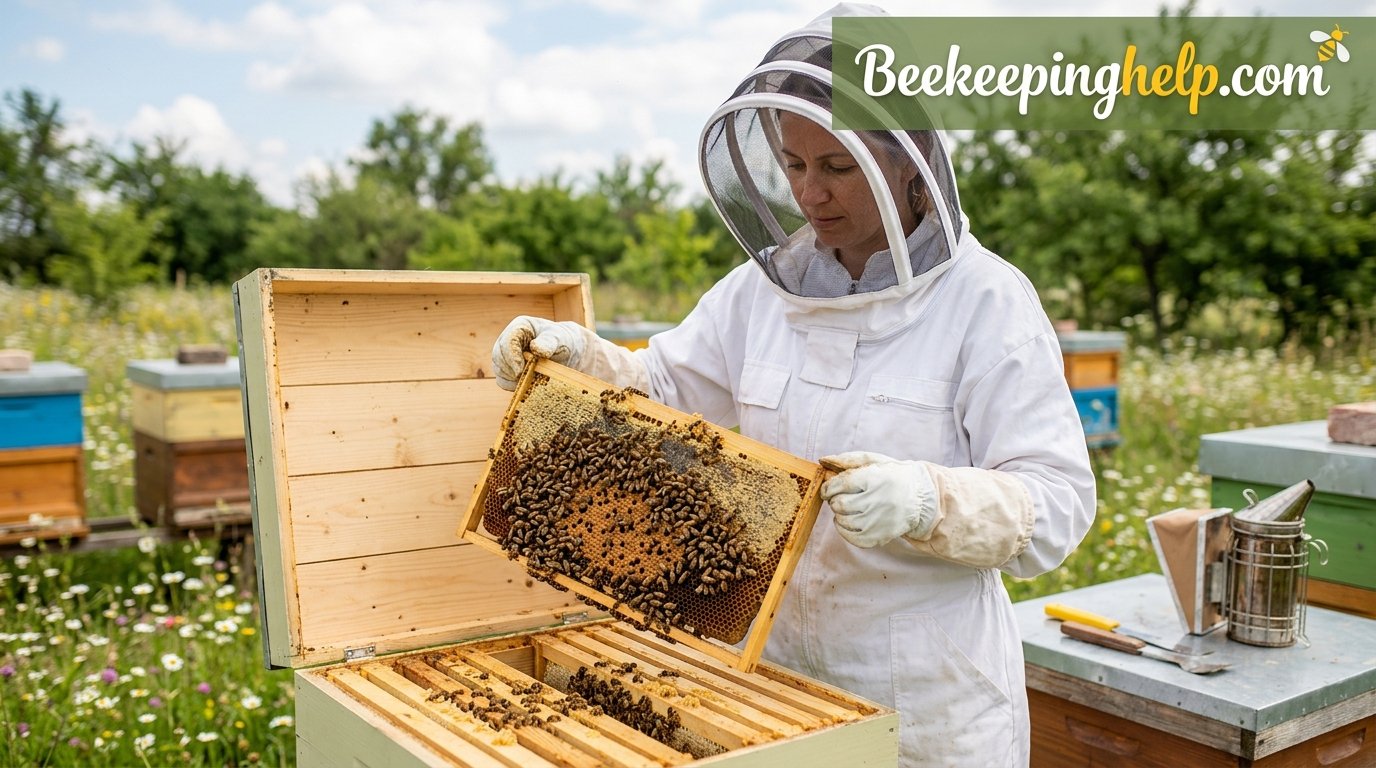
A beekeeper inspecting a brood frame — every hive part exists to support scenes exactly like this one.
Why Understanding Hive Anatomy Matters
Before a single bee ever moves in, a beehive is really just a stack of carefully engineered wooden or polystyrene boxes. Yet each of those boxes, boards, and bars has a specific job that mirrors something the colony would otherwise build for itself inside a hollow tree. When you understand what each part of a bee hive actually does, hive inspections stop feeling like guesswork and start feeling like reading a familiar map. You’ll know instantly why a hive is overheating, why bees are bearding at the entrance, or why a queen suddenly stopped laying in the honey super.
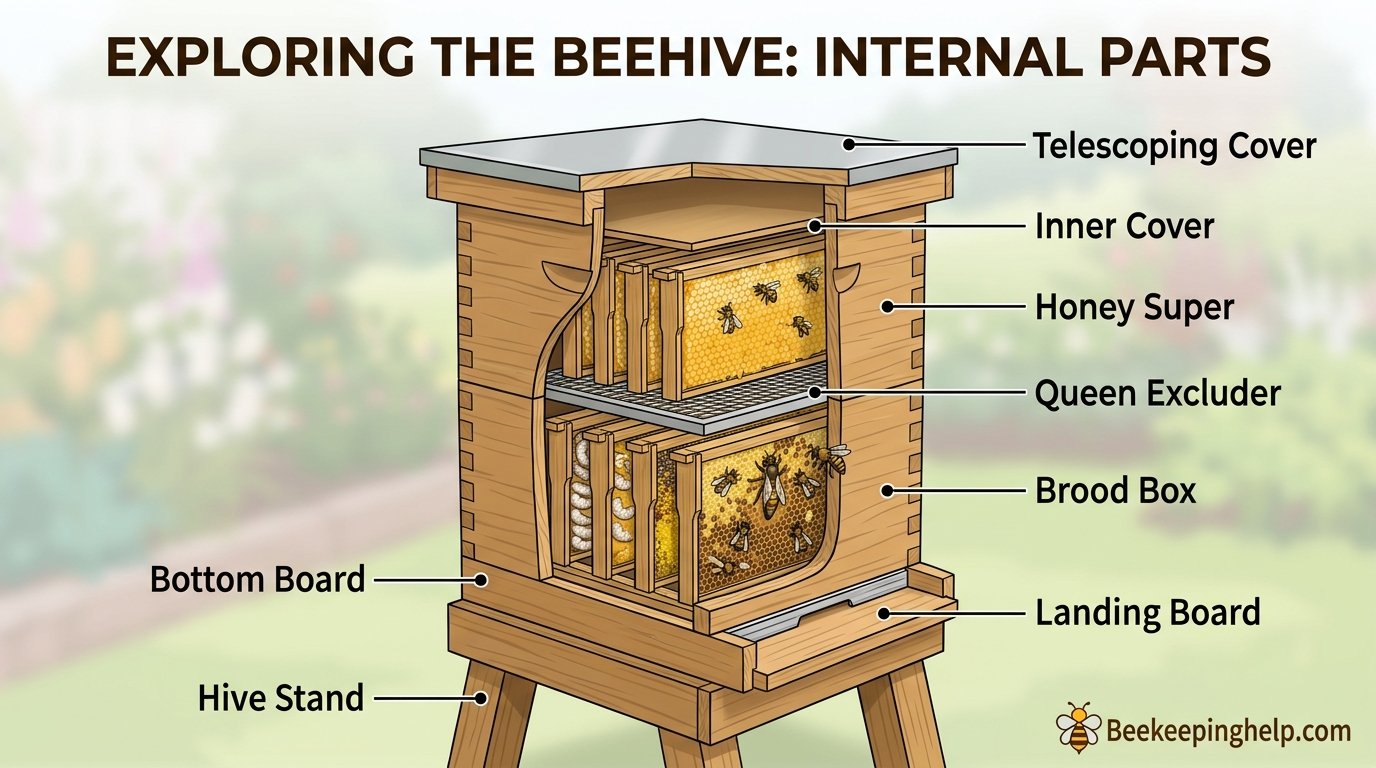
This guide walks through every major component of a modern beehive, starting from the roof and working down to the stand, explaining the function of each piece, how it interacts with the colony’s biology, and what to look for when buying, building, or maintaining your own equipment. Whether you’re just getting started or want a refresher before your first spring inspection, this is the reference you’ll want to bookmark. If you haven’t chosen your equipment yet, our guide on the best beekeeping hives is a great companion piece to read alongside this one.
New beekeepers often assume a hive is just “a box with bees in it.” In reality, a well-designed hive is closer to a modular apartment building, complete with climate control, security systems, food storage, and a nursery, all built from a handful of interchangeable parts. Once you can name each piece and explain its purpose, you’ll also be able to diagnose problems faster: a moldy inner cover tells a very different story than a chewed entrance reducer, and a warped bottom board causes very different symptoms than a missing queen excluder.
It also helps to remember that none of this equipment exists in a vacuum. Bees evolved to nest inside hollow trees, rock cavities, and other naturally sheltered spaces long before humans ever built a wooden box for them. Every part of a modern hive is, in a sense, a translation of something bees already knew how to build for themselves: a defensible entrance, a dry ceiling, a warm nursery near the center, and food stores tucked around the edges. Keeping that natural blueprint in mind makes it much easier to understand why beekeepers arrange equipment the way they do, and why deviating from it, say, by using an undersized box or skipping ventilation, tends to cause predictable problems.
Throughout this guide, we’ll move from the top of the hive to the bottom, in roughly the order you’d encounter each part during a real inspection. Along the way, we’ll flag which components are essential everywhere, which are optional depending on climate and management style, and which are mostly about beekeeper convenience rather than colony survival. By the end, you should be able to look at any stacked hive in a bee yard and explain, box by box, exactly what’s happening inside.
It’s also worth setting expectations about cost and time before diving into individual parts. A single hive, fully equipped with a stand, bottom board, two brood boxes, a couple of supers, an inner and outer cover, frames, and foundation, represents a meaningful upfront investment, and most of that cost is concentrated in the boxes and frames rather than in the smaller accessories. Knowing this ahead of time helps new beekeepers budget realistically instead of being surprised partway through their first season when they realize they need a second brood box or an extra super sooner than expected. We’ll return to specific cost ranges later in this guide, but the short version is that understanding each part’s function also means understanding which purchases are essential on day one and which can reasonably wait until the colony actually needs them.
Finally, it helps to think of hive parts in three broad categories as you read through the rest of this guide: structural parts that hold the colony’s living space together (boxes, frames, bottom board), climate and moisture control parts (covers, ventilation features, quilt boxes), and defense and access parts (entrances, reducers, guards, stands). Almost every piece of equipment discussed below falls cleanly into one of these three roles, and colonies that struggle usually have a weakness in one of them specifically, rather than a vague, unexplainable problem. Keeping this three-part framework in mind as you read will make it much easier to remember not just what each part is called, but why it exists at all.

Want a complete, ready-to-assemble hive?
A pre-cut 10-frame Langstroth starter kit includes every part discussed in this article, sized and matched correctly.
Check Price on AmazonCommon Hive Types at a Glance
Most of the parts described in this article apply directly to the Langstroth hive, which is by far the most widely used design in the world because of its stackable, modular boxes and interchangeable frames. However, other hive styles rearrange or simplify these same functions. Top-bar hives, for example, skip frames and foundation entirely in favor of simple wooden bars, while Flow Hives modify the honey super with a special flow-frame mechanism. Understanding the classic Langstroth parts first makes every other hive style easier to learn, because the underlying biological functions, brood space, food storage, ventilation, and defense, stay the same no matter what the box looks like.
If you’re still deciding between styles, it’s worth browsing our detailed breakdown of beehive types with pictures or comparing two of the most popular modern options directly in our Flow Hive vs Langstroth comparison. For anyone drawn to more naturalistic setups, our article on types of beehives in trees explores how wild colonies solve the same structural problems without any human-built equipment at all.
It’s worth noting that hive style is rarely an all-or-nothing decision made once and never revisited. Many beekeepers start with a single Langstroth hive because parts are easy to find locally, then experiment with a top-bar hive a season or two later once they understand the underlying biology well enough to appreciate what the top-bar design trades away, namely, standardized frame spacing and easy honey extraction, in exchange for lower upfront cost and a more hands-off management style. Others move in the opposite direction, starting with a top-bar or Warre hive for philosophical reasons and later adding a Langstroth or two once they realize how much easier replacement parts are to source for the more standardized design. Neither path is wrong, and understanding the part-by-part function covered in this guide will serve you well no matter which style you eventually settle into.
A less common but increasingly discussed option is the long Langstroth hive, sometimes called a horizontal Langstroth, which keeps the standard Langstroth frame size and bee space but arranges the entire brood and honey storage area horizontally rather than in stacked boxes. This design borrows the top-bar hive’s advantage of not needing to lift heavy boxes while still using frames compatible with standard Langstroth extraction equipment. It’s a useful option for beekeepers who like the idea of a top-bar hive’s ergonomics but don’t want to give up the ability to use a friend’s or neighbor’s extractor at harvest time.
| Hive Style | Key Structural Difference | Best For |
|---|---|---|
| Langstroth | Stackable boxes, removable frames, standardized spacing | Most beginners and commercial keepers |
| Top-Bar Hive | Horizontal design, bars instead of frames, no foundation | Low-cost, natural comb building |
| Warre Hive | Vertical top-bar boxes, nadiring (adding boxes below) | Low-intervention, naturalistic keeping |
| Flow Hive | Langstroth base with a flow-frame honey super | Easy, low-disturbance honey harvest |
| Long Langstroth | Horizontal body, standard Langstroth frames | Beekeepers wanting less lifting with standard equipment |
Outer Cover (Telescoping Top)
The outer cover sits at the very top of the hive and functions much like the roof of a house. Its main job is to keep rain, snow, and direct sun off the rest of the equipment. Most telescoping covers are built with a wooden frame topped by a sheet of galvanized metal, which sheds water and reflects heat during summer. The “telescoping” part of the name refers to the way the cover’s edges hang down over the top edges of the hive body below it, preventing wind-driven rain from creeping in sideways.
Because the outer cover is the hive’s first line of defense against weather, its condition has an outsized effect on colony health. A cover with a cracked or rusted metal sheet will let moisture seep into the wood underneath, and that moisture eventually drips down onto the cluster of bees below, which is one of the leading causes of winter colony losses. Checking the outer cover for damage should be part of every beekeeper’s fall preparation checklist.
Weight is another underappreciated function of the telescoping cover. Because it sits loose on top of the hive rather than being screwed or hinged down, its own weight, combined with a brick or strap in windy areas, is often the only thing keeping the entire stack from being blown apart in a strong storm. Beekeepers in exposed, open areas frequently add a ratchet strap running from the bottom board to the outer cover, or simply set a heavy rock on top, as cheap insurance against a gust that could otherwise scatter boxes, frames, and bees across a field.
Telescoping covers also come in a few finish variations worth knowing about. Some use aluminum instead of galvanized steel, which resists rust indefinitely but dents more easily and costs more. Others use a simple asphalt shingle finish instead of metal, which is cheaper and quieter in hailstorms but needs replacement every several years as the material weathers. A small but growing number of beekeepers use solar-reflective white paint directly on a metal cover in hot climates, since a white surface can meaningfully lower the internal temperature on the hottest days of summer compared to a bare metal or dark-painted equivalent.
What It Does Well
- Sheds rain and snow away from the hive body
- Reflects summer heat with its metal surface
- Provides a stable weight to hold the hive together in wind
What to Watch For
- Rust or dents that let water pool on top
- Warped wood that no longer sits flush
- Loose metal edges that flap in wind
Migratory Covers: A Common Alternative
Not every beekeeper uses a telescoping cover, and it’s worth understanding the main alternative before assuming the telescoping style is the only option. A migratory cover is a flat wooden board, usually with a small cleat on each end, that sits directly on top of the uppermost box without overhanging the sides. As the name suggests, migratory covers were originally designed for commercial beekeepers who move hundreds or thousands of hives on flatbed trucks between pollination contracts, since flat, flush-sitting covers can be packed tightly together without the overhanging lip of a telescoping cover catching on neighboring hives.
For a hobbyist who never moves hives, the appeal of a migratory cover is mostly about cost and simplicity. It uses less material, requires no metal sheeting, and is easy to build from a single piece of plywood in an afternoon. The trade-off is weatherproofing: because a migratory cover doesn’t overhang the hive body, it relies entirely on a tight, warp-free fit to keep water out, and any shrinkage or warping in the wood over time can create gaps that a telescoping cover’s overhang would have hidden. Beekeepers who choose migratory covers typically compensate by painting them thoroughly on all sides, including the underside, and by checking the fit more frequently than they would with a telescoping design.
Some beekeepers run a hybrid approach, using inexpensive migratory covers during the honey flow when hives are checked weekly and any small gap would be caught quickly, then swapping to a telescoping cover with better weatherproofing before winter, when the hive will go unchecked for extended stretches. This isn’t necessary for most backyard setups, but it illustrates how the two cover styles really represent different points on the same trade-off between simplicity and weatherproofing rather than one being strictly better than the other.
Inner Cover
Directly beneath the outer cover sits the inner cover, a thin wooden board with a shallow rim and a small oval or round hole in the center. Its function is often misunderstood, but it plays several roles at once. First, it creates an insulating air pocket between the bees and the metal outer cover, which prevents condensation from dripping directly onto the cluster. Second, its central hole doubles as an upper entrance or ventilation port, and it can also be used with a bee escape board when a beekeeper wants to clear bees out of a honey super before harvest.
In winter, many beekeepers flip the inner cover so the shallow side faces up, creating extra headspace that they fill with an absorbent quilt box or moisture-wicking material. This small adjustment can dramatically cut down on the excess moisture that kills more overwintering colonies than cold temperatures ever do.
The inner cover also plays a quieter, everyday role that’s easy to overlook: it protects the outer cover from propolis. Bees coat almost every surface they can reach with propolis, a sticky resin they gather from tree buds, and without an inner cover in between, they would eventually glue the outer cover directly to the top box, making it difficult to remove without prying and potentially damaging the wood. The inner cover essentially acts as a disposable, easily replaced sacrificial layer that takes the brunt of the propolis buildup instead of your more expensive telescoping cover.
Some inner covers include a routed notch along one edge of the rim in addition to the central hole. This notch functions as a small, permanent upper entrance even when the cover is oriented with the rim facing down, giving foragers and drones an alternate way in and out during periods when the main bottom entrance is congested. It also provides emergency ventilation if the bottom entrance ever becomes blocked by dead bees, snow, or debris, which is a genuinely useful safety feature during harsh winters when a beekeeper might not visit the apiary for weeks at a time.
Honey Supers
A honey super is a shallower box placed above the brood chamber, used exclusively for storing surplus honey that the beekeeper intends to harvest. Supers come in three common depths, deep, medium, and shallow, with medium supers being the most popular compromise between capacity and lifted weight. Since honey is dense, a full deep super can weigh well over 80 pounds, which is why many beekeepers, especially those with back or shoulder concerns, prefer medium or shallow supers even though it means adding more boxes over the course of a season.
Supers are only added once the brood chamber below is strong and has enough space of its own; adding supers too early can actually slow a colony’s buildup, while adding them too late can trigger overcrowding and swarming. Watching for the classic ten-frame rule, roughly seven or eight frames drawn and filled, is a reliable trigger point for adding the next super.
Once a super is full and capped, harvest itself depends heavily on which type of frame is inside it. Traditional wax or plastic foundation frames need to go through an extractor, a centrifuge that spins capped frames to fling honey out of the comb without destroying it, after which the empty comb can be returned to the hive for bees to refill. Comb honey producers use special thin surplus foundation or wooden comb-honey sections instead, skipping extraction entirely and selling the honey still inside its wax comb. Flow Hive style frames use an internal mechanism that cracks open comb cells with a lever, letting honey drain out through a spout without removing the frame from the hive at all, trading some of the traditional beekeeping experience for a dramatically simpler harvest.
Clearing bees out of a full super before harvest is its own small skill. Simply lifting frames out of a box crawling with defensive bees is unpleasant and slow, so most beekeepers use one of a few standard techniques: a fume board treated with a bee repellent that drives bees downward within a few minutes, a triangular one-way bee escape fitted into the inner cover’s hole that lets bees leave the super overnight but not return, or, for smaller operations, simply brushing bees off each frame by hand as it’s removed. Each method trades speed against gentleness, and many experienced keepers switch between them depending on the temperament of the specific colony and the weather that day.
| Super Depth | Approx. Frame Height | Full Weight (10 frames) |
|---|---|---|
| Deep | 9 5/8 in | 60–90 lbs |
| Medium | 6 5/8 in | 40–50 lbs |
| Shallow | 5 3/4 in | 25–35 lbs |

Medium Honey Supers
A lighter-weight option for easier lifting during harvest season, compatible with any standard 10-frame Langstroth hive.
View on AmazonQueen Excluder
Placed between the brood boxes and the honey supers, the queen excluder is a flat grid of metal or plastic with openings sized so worker bees can pass through but the larger queen cannot. Its purpose is simple but important: it keeps the queen confined to the brood chamber so she can’t lay eggs in the honey supers, which would otherwise mix brood comb into what should be pure honeycomb.
Opinions on queen excluders are famously divided among beekeepers. Some call them “honey excluders” because worker bees can be reluctant to pass through the narrow grid, which may slightly reduce how much honey ends up stored above. Others find that a healthy, well-populated colony has no trouble moving through the excluder once nurse bees establish a normal traffic pattern. If you’re unsure whether to use one, our guide on how a beehive works covers this debate along with several other equipment trade-offs in more depth.
The material an excluder is made from affects this debate in practice. Wire-grid metal excluders, often called wire-and-frame excluders, tend to see faster worker traffic than flat plastic sheet excluders, likely because the wire grid gives bees more surface area to grip and orient around as they pass through. Plastic excluders are cheaper and won’t rust, but many experienced beekeepers consider the modest extra cost of a wire excluder worthwhile purely for the reduction in worker hesitation. A middle option, a wood-framed wire excluder, adds rigidity that prevents the sagging some flimsy plastic versions develop over a season of heat exposure.
A useful compromise some beekeepers adopt is to only install the queen excluder partway through the season, once the brood nest is already well established and the queen has settled into a laying rhythm in the lower boxes. Introducing the excluder at that point, rather than from day one, avoids disrupting the queen’s early expansion while still protecting supers once they’re added. Others skip the excluder entirely and instead manage queen movement by watching frames closely and simply moving any brood frames that end up in a super back down into the brood chamber during routine inspections, a technique sometimes called a “queen check” that trades a bit of extra inspection time for one less piece of equipment.
Brood Boxes / Hive Bodies
The brood box, also called a hive body or deep, is the heart of the colony. This is where the queen lays eggs, nurse bees raise larvae, and the colony stores the pollen and honey it needs to feed developing brood. Most Langstroth hives use one or two deep boxes stacked directly on the bottom board, giving the queen enough continuous space to lay in an efficient, expanding pattern.
The number of brood boxes a colony needs depends on climate, bee genetics, and management style. In colder regions, two deep brood boxes are common so the colony has enough stored honey to survive winter without supplemental feeding. In milder climates, a single deep plus a medium is sometimes enough. If you’re building your own equipment rather than buying pre-cut kits, our tutorial on how to make a beehive walks through cutting and assembling brood boxes to standard dimensions.
Brood boxes also play a central role any time a beekeeper performs a split, deliberately dividing one strong colony into two by moving several frames of brood, food, and adult bees into a fresh box with its own bottom board and cover. Because brood boxes are built to standardized dimensions, frames lift straight across from one hive body to another without any modification, which is exactly what makes splits, swarm prevention, and combining weak colonies with strong ones so practical in a Langstroth system. A beekeeper managing several hives will often keep one or two spare, fully assembled brood boxes on hand specifically for this purpose, since needing to build one on short notice during swarm season is rarely convenient.
All-medium hive management is a popular variation worth mentioning here. Rather than using deep boxes for brood and separate shallow or medium boxes for honey, some beekeepers standardize their entire operation on medium boxes for everything, brood chamber included, typically running three medium boxes instead of two deeps. The appeal is straightforward: every box and every frame in the apiary becomes interchangeable, and no single box ever gets heavy enough to strain a beekeeper’s back, since even a full medium of honey tops out around 40 to 50 pounds compared to a deep’s 60 to 90. The trade-off is needing more boxes overall and slightly more frequent inspections to compensate for the smaller single-box footprint.
Frames and Foundation
Frames are the removable wooden or plastic rectangles that hang inside every box, and they’re what actually holds the wax comb the bees build. Foundation is the thin embossed sheet, usually beeswax or plastic, that beekeepers insert into a frame to give the colony a head start and to guide them into building straight, even comb rather than sprawling wild comb across multiple frames.
Standardized frame spacing is one of the most important inventions in modern beekeeping history, since it preserves what’s called “bee space”, a roughly 3/8-inch gap that bees will neither fill with wax nor block with propolis. Every dimension in a modern hive, from frame width to box spacing, is built around maintaining this gap so frames stay separate, movable, and inspectable.
Frame cell size also matters more than many beginners realize. Standard foundation is embossed with a worker-cell pattern sized around 5.4 millimeters across, which encourages bees to draw smaller worker brood cells rather than the larger drone cells they’d build naturally in roughly proportionate amounts. Some beekeepers deliberately include one frame of drone-sized foundation, or no foundation at all, in each brood box specifically to give the colony a dedicated place to raise drones, which can also double as a simple Varroa mite management tool, since mites preferentially reproduce in drone cells and an entire frame of drone brood can be periodically removed and frozen to knock back the mite population.
Wiring is another detail worth understanding, particularly for beekeepers who extract honey rather than sell comb honey directly. Foundation on its own is thin and fragile, especially in summer heat, and a fully drawn, honey-filled frame can sag or even collapse inside an extractor without reinforcement. Wired frames run thin, tensioned wire horizontally through pre-drilled holes in the frame’s side bars, either embedded directly into wax foundation with a heated embedding tool or run through plastic foundation’s built-in wire channels, giving the finished comb enough structural support to survive the centrifugal force of extraction. Frames intended purely for brood, which are rarely spun in an extractor, get away with lighter wiring or none at all.
Frame material choice interacts with foundation choice in ways that are easy to overlook. A wooden frame paired with plastic foundation is probably the most common combination in commercial operations because of its durability, while wooden frames paired with wax foundation remain popular among hobbyists who prioritize a fully natural product and don’t mind replacing comb more frequently. All-plastic one-piece frames, where the frame and foundation are molded as a single unit, are the fastest to install and the easiest to clean, but some colonies are noticeably slower to accept them until they’re coated with a thin layer of beeswax, a step many plastic frame manufacturers now do at the factory to speed up acceptance.
Wax Foundation
- Readily accepted by bees
- All-natural, chemical-free option
- Melts down easily for reuse
Plastic Foundation
- More durable in the extractor
- Resistant to warping in heat
- Sometimes needs a wax coating to be accepted
Bottom Board
The bottom board is the floor of the hive, and it comes in two main styles: solid and screened. A solid bottom board is a simple flat panel that closes off the underside of the hive completely, while a screened bottom board uses a mesh floor that improves ventilation and allows a beekeeper to monitor mite drop using an insertable sticky board underneath.
Screened bottom boards have become the more popular choice in recent years, largely because of the role they play in integrated pest management against Varroa mites. Mites that fall off bees during normal grooming behavior drop through the mesh and can’t climb back up, giving the colony a small but real defensive advantage compared to a solid floor.
Bottom boards also come in a less common but genuinely useful third variant: the slatted rack, a shallow, open-slat frame that sits between the bottom board and the lowest brood box. A slatted rack buffers airflow directly beneath the brood nest, reduces drafts on the lowest frames, gives bees more room to cluster below the frames during hot weather instead of bearding outside the entrance, and is believed by many long-time keepers to reduce the colony’s tendency to build burr comb along the bottom bars of the lowest frames. It’s an optional accessory rather than a core structural part, but it’s common enough in established apiaries that new beekeepers should recognize it when they see one.
Deep versus shallow bottom boards is another dimension worth a quick mention. A standard bottom board typically leaves about three-quarters of an inch of clearance beneath the lowest frames, but “deep” bottom boards with several extra inches of clearance are sometimes used specifically to accommodate a slatted rack or to give a colony extra unused space in which to cluster during winter without needing an entirely separate winter-only box. As with most hive parts covered in this guide, the added clearance is a convenience rather than a strict requirement, and plenty of thriving colonies live out their entire lives on a standard-depth bottom board.
Entrance Reducer and Hive Entrance
The entrance is the small gap, usually at the front of the bottom board, where foragers come and go and where guard bees inspect anyone trying to enter. An entrance reducer is a narrow wooden or plastic strip inserted into that opening to shrink it down. Reducers matter most in early spring and late fall, when a small, weak colony can’t yet defend a full-width entrance against robber bees, wasps, or mice looking for winter shelter.
As colonies grow stronger through late spring and into summer, most beekeepers remove the entrance reducer entirely, since a large, healthy population needs the extra airflow and the wider entrance to keep up with the increased flight traffic of a productive nectar flow.
Most commercial entrance reducers come with two notch sizes cut into the same strip, typically a larger notch of roughly four inches and a smaller notch of about three-quarters of an inch, letting a beekeeper flip the reducer to the appropriate size rather than owning multiple separate pieces. The smallest setting is generally reserved for brand-new package installations and for the depths of winter in cold climates, when even a strong colony benefits from an entrance small enough to defend easily and to slow the loss of warm air on windy days.
Entrance placement itself varies between hive designs in ways worth knowing. Standard Langstroth bottom boards place the entrance at the very front, spanning most or all of the box’s width, while some screened bottom boards include a secondary, smaller entrance at the rear specifically for ventilation and mite-board access without disturbing the main flight path. A handful of specialized entrance designs, including angled or L-shaped entrance tunnels, aim to slow down robber bees and yellowjackets by forcing them through a longer, more easily guarded path, though these remain a niche accessory rather than standard equipment on most hives.
Hive Stand
The hive stand lifts the entire structure off the ground, and while it might look like a minor accessory, it actually protects the colony in several important ways. Elevating the hive keeps the wooden bottom board away from ground moisture, which extends its lifespan considerably, and it also puts the entrance out of easy reach for skunks and other ground-based predators that like to scratch at hive entrances and eat the guard bees that respond.
A good stand is level, sturdy enough to support the full weight of a stacked hive at honey-flow time, and tilted very slightly forward so rainwater drains out through the entrance instead of pooling inside.
Stand height is a genuinely personal choice that beekeepers tend to settle on through trial and error rather than following a single fixed rule. A lower stand, just a few inches off the ground, keeps the hive stable and easy to work on but does little to deter skunks, which are perfectly capable of standing on their hind legs to reach a low entrance. Taller stands, in the eighteen-to-twenty-four-inch range, put the entrance well above a skunk’s comfortable reach and also reduce how far a beekeeper needs to bend when lifting heavy supers, at the cost of making the stack itself slightly less stable in high wind and requiring a small step stool for shorter beekeepers to comfortably inspect the top box.
Materials for stands range from simple concrete blocks stacked two or three high, to purpose-built metal hive stands sold specifically for beekeeping, to elaborate wooden benches designed to hold two or four hives side by side with a small landing shelf built into the front. Whatever the material, the two properties that matter most are that the stand stays level even as the ground beneath it settles or freezes and thaws seasonally, and that it’s rated to hold significantly more weight than the hive will weigh even at its heaviest point in the season, since a stand that fails under a fully loaded hive at the peak of a nectar flow is a far worse outcome than a slightly oversized, overbuilt one.
Feeders
Feeders aren’t part of the permanent hive structure, but they’re common enough, especially for new colonies, package installs, and late-season buildup, that they deserve their own section rather than being lumped in as an afterthought. A feeder’s job is to supply sugar syrup or, less commonly, dry sugar or pollen substitute, at times when natural nectar and pollen aren’t available in sufficient quantity for the colony to build comb, raise brood, or store enough winter food on its own.
The most common style for backyard beekeepers is the internal frame feeder, a hollow plastic frame shaped exactly like a standard frame that sits inside the brood box in place of one comb frame and holds roughly a quart to a gallon of syrup depending on size. Its main advantage is that it doesn’t require opening the top of the hive to refill in cold weather, and bees can access it without leaving the warmth of the cluster. Its main downside is that bees can drown in it fairly easily without a floating ladder or screen insert to give them secure footing while they drink.
Top feeders, sometimes called hive-top feeders, sit above the inner cover and beneath the outer cover, holding significantly more syrup, often a gallon or two, which makes them popular for fast fall feeding when a colony needs to put on winter stores quickly before temperatures drop. Because they sit above the cluster rather than inside the brood chamber, they also don’t take up a frame’s worth of brood space, though they do require removing the outer cover to refill, which briefly exposes the top of the hive to weather and robbing bees from neighboring colonies.
Entrance feeders, small inverted jars that attach to the hive entrance with a plastic bracket, are the cheapest and easiest option to inspect at a glance, since the syrup level is visible without opening the hive at all. Their main drawback is that they sit right at the entrance, which can attract robbing activity from other colonies and can freeze solid in cold weather, making them best suited for mild-season feeding rather than serious winter supplementation. Whichever style a beekeeper chooses, feeders are almost always removed once a strong, reliable nectar flow is underway, both because bees no longer need the supplemental syrup and because leaving a feeder on during a flow can encourage bees to store diluted syrup instead of nectar, slightly degrading final honey quality if that box is ever harvested.

Hive-Top Feeder
Holds enough syrup for fast fall feeding without disturbing the brood chamber.
Check Price on AmazonMouse Guards and Robbing Screens
Two smaller accessories round out the hive’s defensive equipment, and both address threats that have nothing to do with weather: mice and robber bees. A mouse guard is a thin metal strip perforated with holes just large enough for a worker bee to pass through but too small for a mouse to squeeze past, fitted over the entrance from fall through early spring. Without one, a mouse looking for warm winter shelter can chew its way into a quiet, low-activity cluster during the coldest months and build a nest directly inside the lower brood box, destroying comb and stressing the colony at the worst possible time of year.
Mouse guards need to go on before the colony’s cluster shrinks enough in late fall that bees can no longer effectively defend a full-width entrance, and they need to come off again in spring before pollen loads become large enough that foragers start having trouble squeezing through the small holes while carrying a full pollen basket. Missing that spring removal window is a surprisingly common beginner mistake that leads to congestion and occasional pollen loss right at the entrance.
Robbing screens address a different threat: bees and wasps from other colonies attempting to steal stored honey, most commonly during nectar dearths in late summer when natural forage is scarce and a weak or recently disturbed colony becomes an easy target. A robbing screen is a small mesh enclosure fitted over the entrance that forces both defending and attacking bees to navigate an indirect path to get in or out, which tends to confuse robber bees far more than it confuses the resident colony, since guard bees and foragers already know their own hive’s layout. Robbing screens are typically installed proactively during known dearth periods rather than only after robbing has already started, since an active robbing event can escalate and destroy a weak colony within a single afternoon if left unaddressed.
Both accessories share a common theme with the entrance reducer discussed earlier: they’re temporary, seasonal modifications to the same basic entrance opening rather than permanent structural parts, and knowing when to install and remove each one is arguably just as important as owning them in the first place.
Ventilation Components
Bees are remarkably good at regulating their own hive climate, using wing-fanning to cool the brood nest in summer and clustering tightly to conserve warmth in winter, but the equipment still needs to support that effort rather than work against it. Ventilation features, upper entrances, screened bottom boards, moisture quilts, and gaps left under a slightly cracked outer cover, all give excess heat and humidity somewhere to escape.
Moisture management deserves special attention because condensation, not cold, is the more common killer of overwintering colonies in many climates. Warm, humid air rising from the cluster hits a cold inner cover and condenses into water droplets that then rain back down onto the bees. A simple upper entrance or a moisture quilt box addresses this directly by giving that warm air somewhere to vent before it condenses.
Summer ventilation deserves just as much attention as winter moisture control, even though it gets discussed less often. On the hottest days, a large, healthy colony can generate a surprising amount of metabolic heat, and if that heat can’t escape fast enough, bees respond by clustering, or “bearding,” on the outside of the hive rather than inside it, which reduces the workforce available for foraging and comb building during exactly the part of the season when both matter most. Simple summer ventilation strategies include propping the outer cover open slightly with a small shim, adding a screened inner cover in place of the solid version, or installing a purpose-built ventilated top designed to let hot air escape through a mesh panel while still keeping rain out.
Some beekeepers in especially hot or especially cold climates go a step further and add a dedicated ventilation rim, a shallow, screened box that sits between the top brood box or super and the inner cover specifically to increase airflow without permanently modifying any of the standard equipment. This is a more specialized accessory than most of what’s covered in this guide, but it illustrates a broader point worth remembering: ventilation isn’t a single fixed feature built into one part of the hive, but rather a balance maintained across several different components working together, and a change to one, like removing the entrance reducer, closing an upper entrance, or swapping a solid inner cover for a screened one, shifts that balance in ways that are worth thinking through rather than doing on autopilot.

Moisture Quilt Box
Wicks away excess winter condensation before it can drip onto the cluster below.
Shop on AmazonHive Part Comparison Table
Here’s a quick-reference summary tying every part covered above back to its primary function, useful as a cheat sheet during your next hive assembly or inspection.
| Part | Primary Function | Check Frequency |
|---|---|---|
| Outer Cover | Weatherproofing | Seasonally |
| Migratory Cover | Lightweight weatherproofing, stackable transport | Seasonally |
| Inner Cover | Insulation, upper vent/escape | Seasonally |
| Honey Super | Surplus honey storage | Weekly in flow season |
| Queen Excluder | Confines queen to brood area | Per inspection |
| Brood Box | Egg-laying, brood rearing | Every 7–10 days in season |
| Frames/Foundation | Comb structure, bee space | Per inspection |
| Bottom Board | Floor, mite monitoring (screened) | Monthly |
| Entrance Reducer | Defense, draft control | Seasonally |
| Hive Stand | Elevation, drainage, predator defense | Annually |
| Feeder | Supplemental syrup or sugar | Weekly while in use |
| Mouse Guard | Blocks rodent entry in cold months | Install fall, remove spring |
| Robbing Screen | Confuses robbing bees and wasps | During dearth periods |
Materials: Wood vs Poly vs Plastic
Hive parts today are typically made from pine, cedar, polystyrene, or injection-molded plastic. Pine is the most affordable and widely available option but needs painting or another protective finish to last outdoors; our guide on how to paint a beehive covers safe paint choices and application techniques. Cedar resists rot naturally and needs little to no finishing, but it costs more upfront. Polystyrene hives offer excellent insulation, which can meaningfully help colonies in cold climates, though they’re less durable against woodpecker damage or rough handling. Plastic frames and foundation trade a slightly lower acceptance rate by bees for much greater durability during honey extraction.
Beyond the four main materials, a few less common options are worth a brief mention. Cypress, popular in the southeastern United States where it’s locally abundant, offers rot resistance similar to cedar at a somewhat lower regional price. Recycled or composite plastic lumber shows up occasionally in stands and bottom boards, valued mainly for never rotting or splintering, though it’s rarely used for full boxes because of its weight and cost. Whatever material a beekeeper chooses, matching external box dimensions across materials, so a polystyrene brood box and a wooden super stack together with a tight, bee-space-correct seam, matters more for day-to-day usability than the specific material itself.
Insulation value is worth quantifying briefly, since it’s the main practical argument in favor of polystyrene. A typical wooden box provides relatively little insulation on its own, which is part of why wooden-hive beekeepers in cold climates rely more heavily on double brood boxes, moisture quilts, and windbreaks to help colonies conserve winter heat. Polystyrene’s cellular structure traps air far more effectively, which is why colonies in polystyrene hives often show slightly faster spring buildup and somewhat lower winter feed consumption compared to genetically similar colonies in wooden equipment in the same apiary, though the difference is rarely dramatic enough to be the sole deciding factor for most beekeepers choosing between the two.
Cost Breakdown of a Full Hive Setup
Because so much of this guide has discussed individual parts in isolation, it’s worth stepping back and looking at what a complete, functional hive actually costs to assemble from scratch, since that total is what most new beekeepers actually need to budget for before their bees ever arrive. Prices vary by region, material, and whether equipment is bought assembled or as unassembled kits that require gluing and nailing, but the relative proportions tend to hold steady across most suppliers.
The bottom board, hive stand, and covers together typically represent a modest share of total cost, since they use less material than the boxes themselves. The two brood boxes, needed on day one for any new colony, along with the frames and foundation to fill them, usually represent the single largest line item in a starter setup, simply because there are so many individual frames involved and because brood boxes need to be purchased before the colony can be installed at all. Honey supers and their frames are often deferred to the following season for a brand-new colony, since a first-year package typically needs to focus its energy on building out the brood chamber rather than storing harvestable surplus, which spreads part of the total cost out over the colony’s first full year rather than requiring it all upfront.
Smaller accessories, the queen excluder, entrance reducer, mouse guard, and a basic feeder, add up to a comparatively minor expense individually but are easy to forget when budgeting for a first hive, since none of them show up in a bare “hive kit” listing that only includes the structural boxes. A realistic first-year budget for a single, fully equipped Langstroth colony, including the bees themselves, a beginner beekeeping suit, a smoker, and a hive tool alongside the equipment covered in this guide, is one of the more common questions new beekeepers ask, and the honest answer is that most of that first-year total goes toward the boxes, frames, and bees rather than the smaller accessories discussed throughout this article.
One practical way to manage cost without compromising colony health is to prioritize purchases in the order a colony will actually need them: a bottom board, stand, one or two brood boxes with frames, an inner and outer cover, and a smoker and suit are truly essential from day one, while a queen excluder, additional supers, a dedicated feeder, and accessories like robbing screens can reasonably be purchased over the following weeks and months as the colony grows into needing them. Buying everything at once isn’t wrong, but it isn’t necessary either, and spacing purchases out according to the colony’s actual development is a perfectly sound way to manage a beekeeping budget in the first year.
Sustainability and Reusing Equipment
Beekeeping equipment, unlike a lot of consumer goods, is built to last for many years and to be reused across multiple colonies over its lifetime, which makes secondhand and reclaimed equipment a genuinely reasonable option for cost-conscious beekeepers, with a few important caveats. Wooden boxes, bottom boards, and covers can often be cleaned, scraped of old propolis and burr comb, and repainted for another decade of service, and buying used equipment from a retiring beekeeper is a long-standing tradition in many local beekeeping clubs.
The major caveat is disease. American foulbrood, a serious and highly contagious bacterial brood disease, produces spores that can remain viable inside wooden equipment for decades, which means used equipment from an unknown or disease-affected source carries real risk that a simple visual inspection can’t fully rule out. Reputable secondhand equipment typically comes with some assurance about the health history of the colony it housed, and many experienced beekeepers scorch the interior of used wooden boxes with a propane torch as an extra precaution before reuse, a technique that kills surface spores without damaging the wood itself. Frames and foundation, which have much more direct contact with brood, are generally considered riskier to reuse from an unknown source than boxes and covers, and many beekeepers choose to replace foundation entirely even when reusing the surrounding wooden frame.
Beyond secondhand equipment, sustainability considerations show up in a few other places discussed throughout this guide. Wax foundation, being a natural, renewable product that can be rendered down and reformed repeatedly, appeals to beekeepers who want to minimize plastic in their apiary, while plastic foundation’s much longer service life means fewer total units manufactured and shipped over a beekeeper’s lifetime, which is its own kind of sustainability argument. Cedar and cypress boxes, needing no petroleum-based paint or sealant to last outdoors, offer a lower-maintenance, lower-chemical alternative to painted pine, at the cost of a higher upfront price that some beekeepers offset over time through the wood’s much longer service life.
Regional Considerations
Nearly every hive part discussed in this guide gets used slightly differently depending on regional climate, and it’s worth calling that out directly rather than leaving beekeepers to infer it. In hot, dry climates like the southwestern United States, ventilation components and shade become the dominant concern for most of the year, entrance reducers are rarely needed even for weak colonies since robbing pressure and cold-weather drafts are less of an issue, and polystyrene’s insulation advantage matters less than its ability to reflect heat when painted a light color.
In cold northern climates and much of Canada, the opposite priorities dominate: double deep brood boxes, moisture quilts, mouse guards, and reduced entrances become essential rather than optional, and many beekeepers wrap hives in black roofing paper or foam insulation panels through the coldest months, effectively adding a temporary, removable insulation layer on top of whatever material the boxes themselves are made from. Screened bottom boards are sometimes fitted with a removable solid insert specifically for winter in these regions, since the ventilation benefit that makes screened boards attractive in summer becomes a liability when it comes to retaining winter warmth.
Humid subtropical and coastal climates bring their own specific challenges, chiefly around wood rot, mold, and hive beetles, a pest that thrives in warm, humid conditions and lays eggs in comb and stored pollen. Beekeepers in these regions often lean more heavily toward naturally rot-resistant woods like cypress or cedar, screened bottom boards for year-round ventilation, and in-hive beetle traps that fit between frames, an accessory not covered elsewhere in this guide simply because its usefulness is so regionally concentrated. Rainfall intensity in these areas also raises the stakes on outer cover maintenance discussed earlier, since a small gap that would cause only minor issues in a drier climate can let in a genuinely significant amount of water during a subtropical downpour.
Maintenance and Seasonal Setup
Good hive parts last for many years, but only with a bit of routine care. Spring setup usually means removing entrance reducers, adding supers as the colony grows, and checking for any winter damage to the bottom board or outer cover. Summer maintenance is mostly about monitoring super space and ventilation during nectar flows. Fall prep is arguably the most important season for hive parts specifically: reinstalling entrance reducers, adding mouse guards, checking cover integrity, and setting up moisture management before the first hard freeze.
If you’re setting up an apiary for the first time, our beginner’s overview of how to start beekeeping is a useful companion resource that walks through the full first-year timeline alongside the equipment decisions covered here.
Beyond the seasonal checklist, a periodic deep maintenance pass is worth scheduling every year or two regardless of season. This typically involves scraping accumulated propolis and burr comb from box edges and frame rests, repainting or resealing exposed wood surfaces that have started to gray or crack, checking that hive tool scraping hasn’t thinned box walls to the point of weakness, and rotating older, heavily used dark brood comb out of the hive in favor of fresh foundation, since old comb accumulates pesticide residue and pathogen buildup over years of continuous use in a way that’s easy to forget about during routine weekly inspections.
Common Beginner Mistakes with Hive Parts
- Mismatched box sizes: Mixing deep and medium boxes without tracking which frames go where creates awkward bee space and burr comb.
- Skipping the queen excluder debate: Adding one without understanding the trade-offs, or avoiding one out of habit without reconsidering it.
- Ignoring ventilation until winter: Moisture problems build gradually; by the time condensation is visible, damage may already be done.
- Leaving unfinished wood unprotected: Unpainted pine boxes warp and rot far faster than finished ones.
- Forgetting the hive stand: Placing boxes directly on the ground invites moisture damage and predator access.
- Forgetting to remove the mouse guard in spring: A guard left on too long congests returning foragers loaded with pollen and can be mistaken for a much more serious entrance problem.
- Buying used equipment without any disease history: Secondhand boxes and frames from an unknown source carry a real, if small, risk of introducing American foulbrood spores into an otherwise healthy apiary.
Frequently Asked Questions
What is the most important part of a beehive?
Most beekeepers would point to the brood box, since it houses the queen and the entire next generation of the colony, but every part plays a supporting role that keeps the brood chamber functioning properly.
Do I need a queen excluder?
It’s optional. A queen excluder keeps brood out of your honey supers, which many beekeepers value, but some colonies are reluctant to pass through it, so it comes down to personal preference and colony behavior.
How many honey supers does a hive need?
It depends on your local nectar flow, but most established colonies fill one to three medium supers during a strong flow season, so having spares on hand is wise.
What’s the difference between a hive body and a super?
A hive body (brood box) is where the queen lays eggs and brood is raised, while a super sits above it and is used purely for surplus honey storage.
Should I use a screened or solid bottom board?
Screened bottom boards offer better ventilation and help with Varroa mite monitoring, while solid boards offer more warmth retention in very cold climates. Many beekeepers use screened boards with a removable solid insert for winter.
Why does my inner cover have a hole in the middle?
That hole functions as an upper entrance and ventilation port, and it can also be fitted with a bee escape board when clearing bees from a honey super before harvest.
How high should a hive stand be?
Anywhere from a few inches to about eighteen inches works well; the goal is simply to keep the bottom board off the ground and out of easy reach of ground-based predators.
Can I mix wooden and polystyrene hive parts?
Yes, many beekeepers combine materials, such as a polystyrene brood box for winter insulation paired with wooden supers, as long as external dimensions match so boxes stack securely.
When should I remove the entrance reducer?
Once the colony is strong and flight traffic is heavy, typically in late spring, removing the reducer improves airflow and gives foragers room to come and go without congestion.
How often should I inspect hive parts for damage?
A quick visual check at every inspection is ideal, with a more thorough review of covers, boards, and stands during spring setup and fall preparation each year.
Do I need a feeder for every hive?
Not always. A well-established colony with a strong nectar flow nearby may never need supplemental feeding, but new packages, splits, and colonies building up stores before winter typically benefit from one.
Is a migratory cover better than a telescoping cover?
Neither is strictly better; a telescoping cover offers superior weatherproofing thanks to its overhang, while a migratory cover is lighter, cheaper, and easier to stack tightly, which is why it’s favored by commercial operations that move hives frequently.
Bringing It All Together
Every part of a beehive, from the metal-topped outer cover down to the humble hive stand, works together to recreate the shelter, climate control, and security a colony would otherwise have to build for itself inside a hollow tree. Once you can name each piece and explain what it does, hive inspections become far less mysterious, and equipment decisions, wood versus poly, screened versus solid, excluder or no excluder, become much easier to make with confidence.
The parts covered in this guide also aren’t a fixed, one-time purchase list so much as a toolkit that a beekeeper adds to and adjusts year after year, swapping a solid inner cover for a screened one during a hot summer, adding a slatted rack after noticing excessive bearding, or finally investing in medium supers after one too many sore backs during harvest. Treat this guide as a reference to return to whenever a new question comes up, rather than something to memorize all at once, and the individual parts will start to make intuitive sense the more time you spend working hives in person.
Ready to put this knowledge into practice? Explore our full equipment guide to the best beekeeping hives and start building a setup that fits your climate, budget, and goals.
Shop Complete Hive Kits on Amazon